

How To Turn On Dhcp On Windows 7
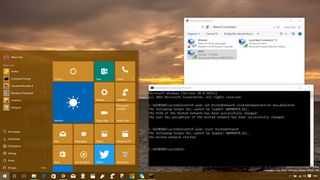
Whether y'all're connecting to the internet using a wireless or wired adapter, similar to previous versions, Windows x allows you to share an internet connection with other devices with a characteristic called "Hosted Network".
Hosted Network is a feature that comes included with the Netsh (Network Shell) command-line utility. It'south was previously introduced in Windows vii, and it allows you lot to use the operating arrangement to create a virtual wireless adapter – something that Microsoft refers to "Virtual Wi-Fi" — and create a SoftAP, which is a software-based wireless admission point.
Through the combination of these two elements, your PC tin can take its internet connection (exist it an ethernet connectedness or hookup through a cellular adapter) and share it with other wireless devices — essentially acting every bit a wireless hotspot.
In this Windows 10 guide, we'll walk you through the steps to verify if your network adapter supports the characteristic, how to configure and enable a wireless Hosted Network, and how to cease and remove the settings from your computer when you no longer demand the feature.
To follow this guide, yous'll need to open the Command Prompt with administrator rights. To do this, utilise the Windows primal + X keyboard shortcut, and select Control Prompt (Admin).
How to check if your wireless adapter supports Hosted Networks in Windows 10
While some adapters include back up for Hosted Network, you volition first need to verify your estimator's physical wireless adapter supports this characteristic using the following command:
NETSH WLAN bear witness drivers 
If the generated output shows Hosted network supported: Yeah, then you can continue with the guide. If your wireless adapter isn't supported, you could attempt using a USB wireless adapter that supports the feature.
How to create a wireless Hosted Network in Windows 10
Creating a wireless hotspot in Windows 10 is relatively straightforward — don't let the command line scare you. Simply follow the steps beneath to configure a wireless Hosted Network:
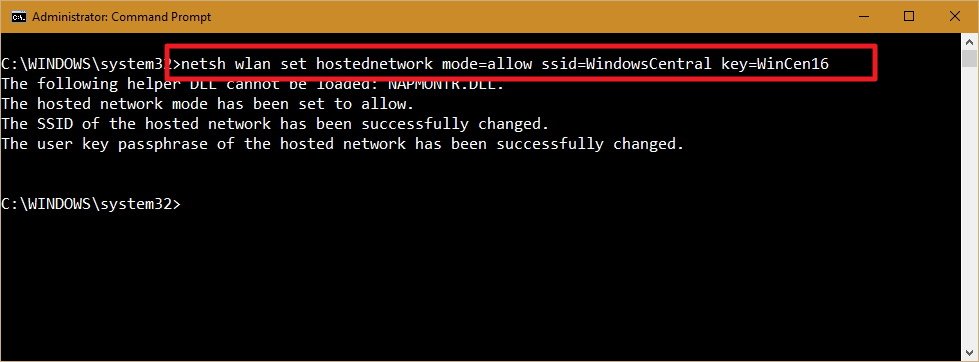
- While in Command Prompt (Admin) enter the following command:
NETSH WLAN set hostednetwork manner=allow ssid=Your_SSID key=Your_PassphraseWhere the SSID would be the name you lot want to place your wireless network when trying to connect a new device, and the passphrase is the network security primal you want users to employ to connect to your network. (Remember that the passphrase has to be at least 8 characters in length.)
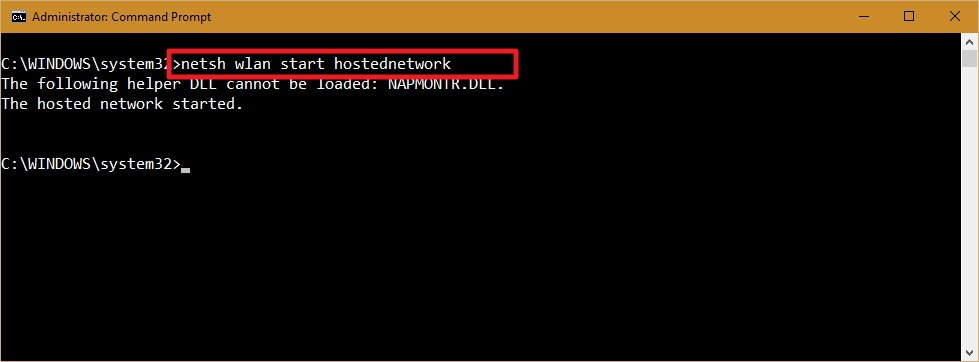
- Once you created a Hosted Network, enter the following control to activate it:
NETSH WLAN start hostednetwork
Up to here, y'all created and started a Hosted Network in your Windows 10 PC. Still, any wireless capable device won't be able to access the cyberspace just yet. The last thing you need to do is to share an internet connectedness using the "Internet Connection Sharing" feature from a concrete network adapter.
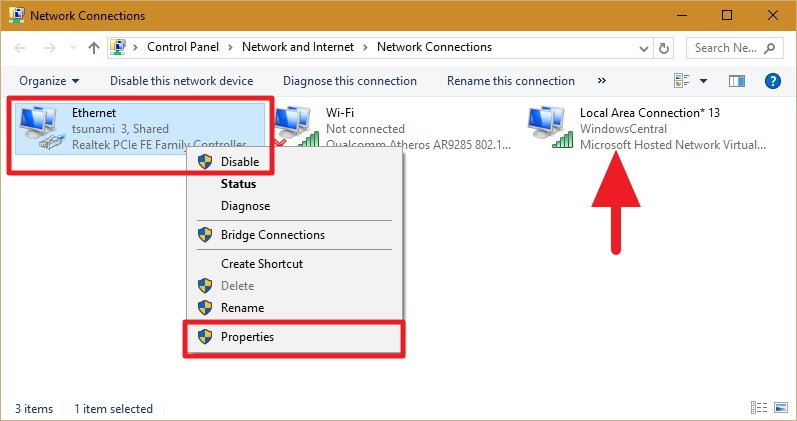
- Apply the Windows key + X keyboard shortcut to open the Power User menu, and select Network Connections.
- Side by side, right-click the network adapter with an internet connectedness – this could exist a traditional Ethernet or wireless network adapter — select Properties.Note: In Network Connections, you should now encounter a new our new Microsoft Hosted Virtual Adapter which is labeled Local Area Connexion* 10, and with the SSID name.
- Click the Sharing tab.
- Bank check the Permit other network users to connect through this computer'southward Internet connection option.
- Next, from the Domicile networking connection drop-down bill of fare select the Microsoft Hosted Virtual Adapter.
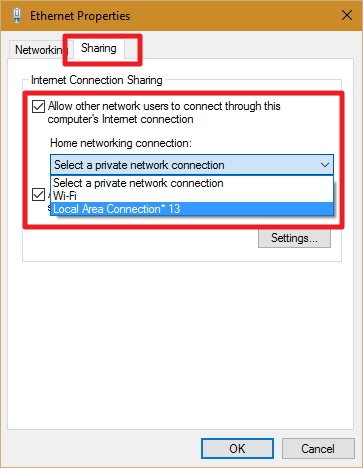
- Click OK to finish.
At this indicate, you should be able to see and connect whatsoever wireless capable device to the newly created software access betoken, and with access to the net.
How to finish sharing an internet connection with other devices in Windows 10
If you lot want to temporary stop allowing other devices to connect wirelessly through your computer, y'all can type the post-obit control in the Command Prompt and hit Enter:
NETSH WLAN stop hostednetwork 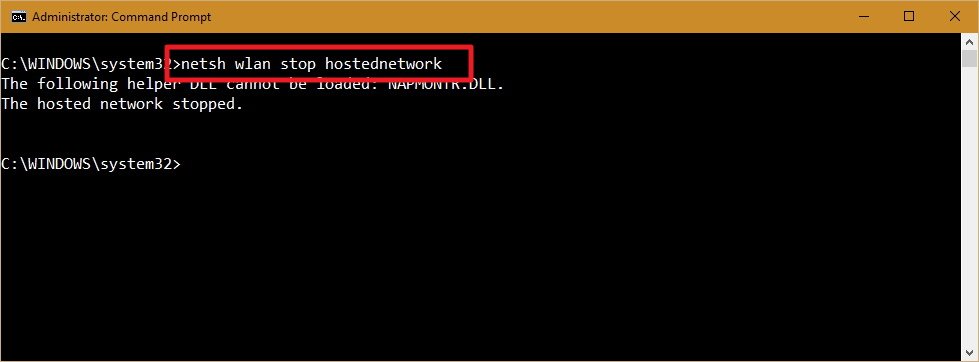
At whatsoever fourth dimension, you can just utilize the start variant of the command to let other devices to connect to the internet using your computer as an access point without actress configuration:
NETSH WLAN get-go hostednetwork
Similarly, you can as well use the following control to enable or disable a wireless Hosted Network:
NETSH WLAN set hostednetwork way=allow NETSH WLAN set up hostednetwork mode= disallow How to modify a Hosted Network settings in Windows 10
In the case you want to change some of the electric current settings, such equally SSID or network security you lot can use the following commands:
NETSH WLAN set hostednetwork ssid=Your_New_SSID NETSH WLAN set up hostednetwork key=Your_New_Passphrase How to view the electric current Hosted Network settings
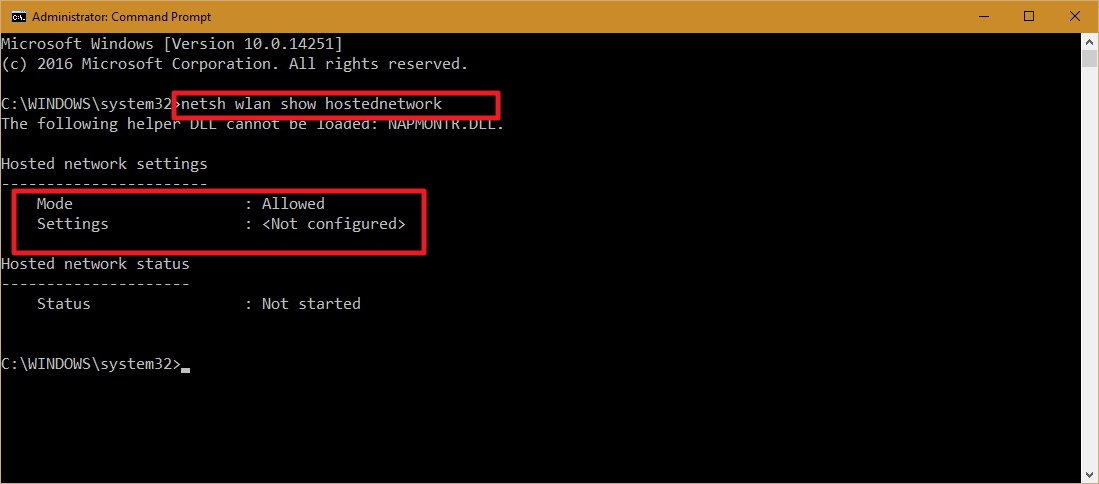
There are 2 commands to view the Hosted Network settings on your estimator:
The following control shows the mode and SSID name in use, max number of clients that tin connect, type of authentication, and zero:
NETSH WLAN show hostednetwork And the post-obit command will also reveal the current network security central amidst other settings, similar to the previous control:
NETSH WLAN testify hostednetwork setting=security 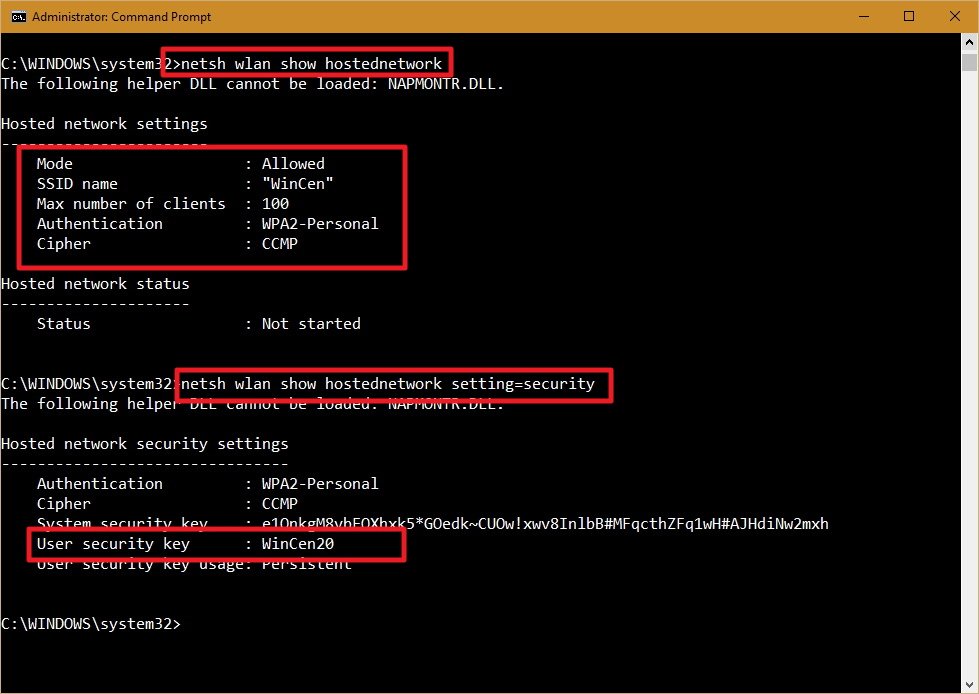
How to disable a wireless Hosted Network in Windows 10
While the setup of a wireless Hosted Network in Windows 10 is not very complicated, Microsoft doesn't brand very straightforward to remove the configurations when you no longer need the feature.
Although you can employ the stop or disallow commands, these actions won't eliminate the settings from your estimator. If yous want completely delete the Hosted Network settings in Windows 10, you lot'll need to change the Registry.
Important: Before you modify anything settings on your computer, information technology's worth noting that editing the Windows Registry can be a unsafe game that tin can cause irreversible damages to your arrangement if you don't know what yous are doing. As such, it'south recommended for you to make a full backup of your system or at least System Restore Signal before proceeding with this guide. You accept been warned!
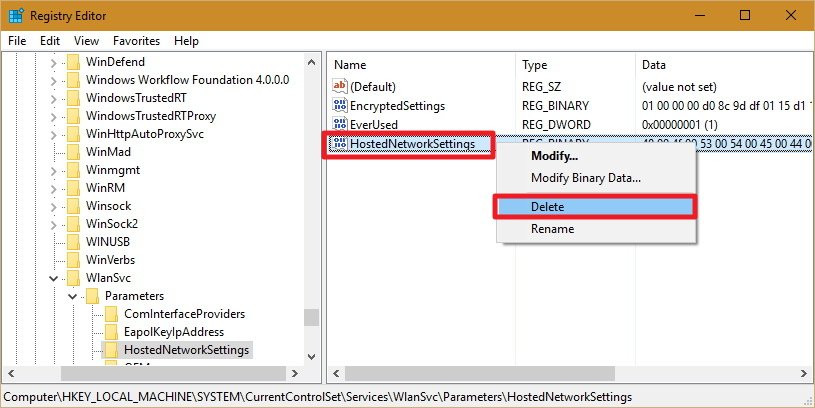
- Open up the Get-go menu, do a search for regedit, hit Enter, and click OK to open the Registry with admin rights.
- Scroll downwardly the post-obit path in the Registry:HKEY_LOCAL_MACHINE\arrangement\currentcontrolset\services\wlansvc\parameters\hostednetworksettingsRight-click the HostedNetworkSettings DWORD key, select Delete, and click Yes to confirm deletion.
- Restart your computer
- Open to the Command Prompt and use the post-obit command:
NETSH WLAN evidence hostednetworkYou lot will know that yous have successfully deleted the settings when the Settings field reads Non configured.
- Brand sure y'all turn off "Internet Connection Sharing" in the physical network adapter that was sharing the internet with other devices. Use the Windows key + X keyboard shortcut to open the Ability User menu, and select Network Connections.
- Right-click the network adapter, and select Properties.
- Click the Sharing tab.
- Uncheck the Allow other network users to connect through this computer'southward Cyberspace connection option.
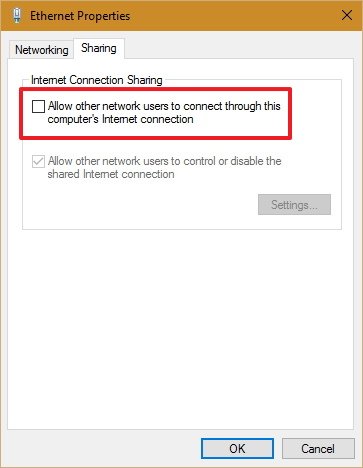
- Click OK to complete the procedure.
Things you need to know
Although the wireless Hosted Network feature in Windows ten allows you to implement an access bespeak solution to share an net connexion with other devices, it's not meant to be a solution to replace a physical wireless access point.
As well, at that place are a few things you desire to consider. For case, wireless speeds will dramatically be reduced compared to the rates provided from a physical access point. Perhaps it would not be a big bargain for cyberspace browsing, merely downloading or transferring big files could exist an issue for some users.
You also need to consider that your computer needs to be ever turned on to act as a wireless admission point. If the computer enters into slumber, hibernate, or restarts, your wireless hotspot will end working, and you volition need to start manually the feature using the
NETSH WLAN start hostednetwork command.
You cannot run a SorftAP and ad hoc at the same time on Windows. If y'all need to create a temporary network connection between two computers, setting up ad hoc will plough off SoftAP — you can run one or the other, not both at the aforementioned time.
Wrapping things up
Wireless Hosted Network is a nifty feature in Windows can be a neat tool to accept for when you lot need to create a wireless access bespeak on the go. It won't match the operation of a physical wireless admission bespeak, but information technology can be useful for many unexpected scenarios — like having one wired ethernet connexion and several devices you want to become online. It's not a replacement for the existent thing, but in a gummy state of affairs, it can be just the ready you lot need.
More than resources
For more tips and tricks on Windows ten, and get the latest news, you can visit the following resources:
- Windows ten on Windows Central – All you demand to know
- Windows ten help, tips, and tricks
Source: https://www.windowscentral.com/how-turn-your-windows-10-pc-wireless-hotspot
Posted by: hatfieldplancionsing.blogspot.com
0 Response to "How To Turn On Dhcp On Windows 7"
Post a Comment